By Dan Carlson
Yep, you read that right. I have taken a trip across the Firelock-Blogverse from Blood and Pigment to write about another Firelock product I absolutely adore: Blood and Valor. The WWI Skirmish game was interesting to me enough to playtest (earning me a wonderful credit in both introductions. Thanks Rufus!!!). Like Blood and Plunder, the original book set the premise. Now that Age of Empires has dropped, I was VERY quick to grab some Russians (my preferred nationality to play in most historical games. More on that later!) and get to the trenches!
The Russian Imperial Army during The Great War looked like a game changer on paper, but had many issues from lack of supplies, incompetent commanders, and low morale. In Blood and Valor however, they are a rewarding faction to play and change up the formula drastically with their own Special Rules and straight forward play.
History: It’s important Y’all!
“Russia is a riddle, wrapped a mystery, inside an enigma”-Winston Churchill
When Russia entered the Great War, many of the other Imperial Powers regarded its army rather favorably. While the standing army was 1,400,000 strong, its fully mobilized army was comprised of 5,000,000 soldiers. The army of Tsar Nicholas II was the largest in the world, and it was expected that they would use these number to absolutely smash the numerically inferior armies of Germany and Austria-Hungary into scraps not even worthy of the Tsar’s borsch. However, as history usually shows us, this was far from the case.
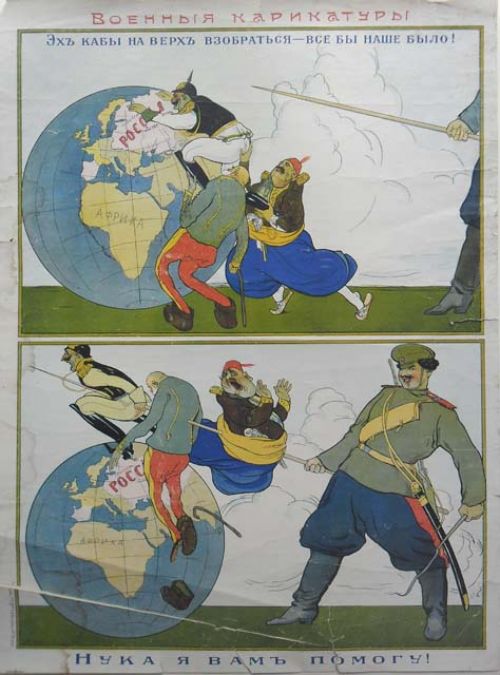
A Russian propaganda poster depicting Kaiser Wilhelm II, Franz Joseph I, and Mehmed V stating “If only we could get to the top – it would be ours!” The bottom reads: “Let me help you with that!”
While the Imperial Russian Army had 5 million soldiers, they only had 4.6 million rifles. Russia was forced to contract weapons from anybody willing to sell them; resulting in Mosin-Nagant rifles made by Remington and even a Model 1895 lever action, chambered in the Russian 7.62x54r, complete with stripper clip guides!). While the image of unarmed Russian soldiers persists in Western thought, most soldiers at the front had rifle, but lacked ammunition and boots due to Russia’s industrial base being unable to provide for the sheer scale of the Russian Army.
This combination of poorly supplied equipped troops, and incompetent leadership caused morale to slowly deplete as the Great War raged. In August 1915, Tsar Nicholas II decided to take control of the army – allegedly after hearing the voice of God. Despite overseeing the successful Brusilov Offensive, he became the public face for every subsequent defeat until the February Revolution and his eventual abdication in March of 1917. They would continue fighting in the trenches for another year, first as the Russian Army, and then as the Red Army – until the Bolshevik government signed the Treat of Brest-Litovsk in March, 1918.
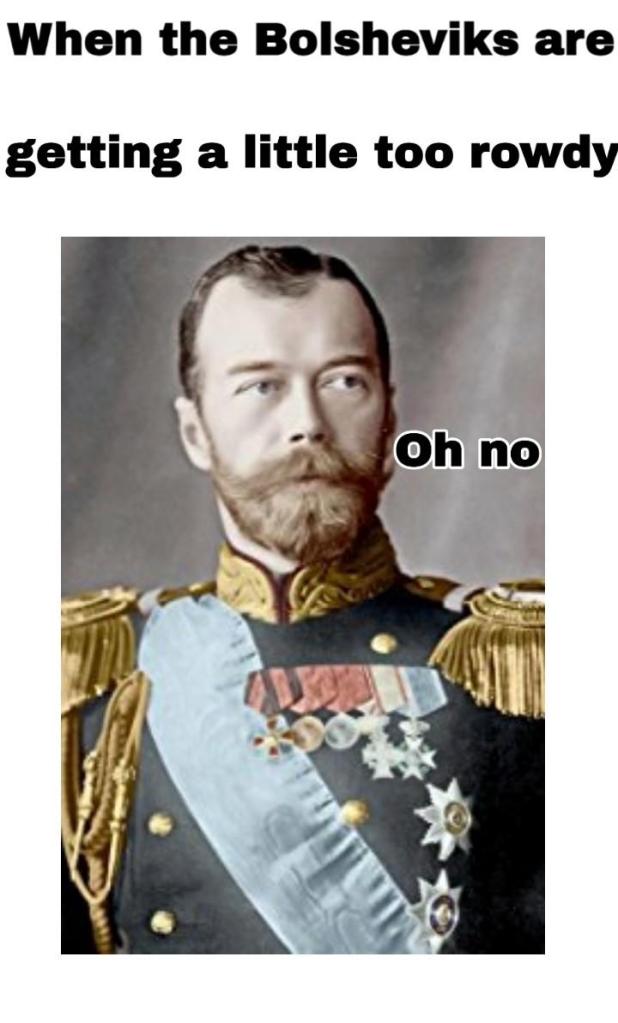
While Tsar Nicholas II is often painted as a family man, he was a ruthless autocrat who often took out his frustrations on Russia’s Jewish population and violently crushed any attempt to overthrow of his government. His archaic, autocratic rule ultimately doomed himself and his family, when the Bolsheviks took over the government in October 1917.
Why play the Russian Imperial Army?
As stated earlier, when it comes to historical games, I always tend to lean towards playing the Russians if possible. The history of the nation has always intrigued me and they usually offer a different flavor of play when compared to their European counterparts. Because I live in the USA, Russian history is usually glossed over right up until World War II and the Cold War, so I have had to do my own reading on the subject (my personal library is mostly books on the subject, followed by non-fiction books about Sea roving).
With that little tidbit out of the way, onto the issue at hand: Why play the Imperial Russian Army? Wouldn’t all these issues with supply and boots make them a terrible faction to play as? In short: nope. The wizards DeVane have made it so we can play a version of the army not plagued by these issues! Every soldier has a rifle, boots (unless you decide to do some sculpting. I won’t judge you) and a will to fight for Tsar and Fatherland! While they lack most of the fun toys that other Nations get – like Rifle Grenades and Light Machine Guns, they handle Fatigue much better and can be an absolute pain to dislodge from a position!
Faction OVerview
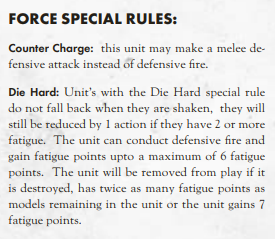
The Imperial Russian Army may seem difficult to play at first, ALL of their infantry units have the Die Hard Special Rule (pictured below). This makes them very difficult pry off of objectives or route in melee without eliminating the entire unit. This is good, because as a Russian player you lack the firepower of other Nations like France, Germany, and Britain. This rule simulates something common amongst the Russian Military that was a constant from the Tsars to the Soviet Era: Russian Troops would rarely every break ranks and run without explicit orders from above. In the Chaos of the Eastern Front, if a commander was killed or communications broke down, Russian units would often fight to the last man or break only when there were very few soldiers remaining (or when an order for retreat finally came). This was also seen in the Soviet Invasion of Afghanistan in the 1980s.
Two units have access to the Counter Charge Special Rule: The Imperial Russian Close Combat Specialists and the Gvardiya Close Combat Specialists. Both of these units are great in melee and the prospect of having these units fight back instead of shooting is worrying for those on the receiving end.
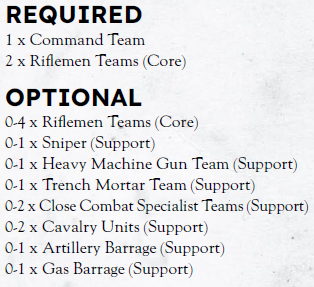
The Force List for the Imperial Russian Army is pretty standard. As of the release of End of Empires they can also take a Field Gun as a Support choice. Having plenty of riflemen and an HMG or Field Gun (unless you’re playing a very large game, I’d advise one or the other and not both) is a solid base, with some customization if you’d like to have some fast moving cavalry or scrappy melee fighters depending on the scenario and personal preference.
Units
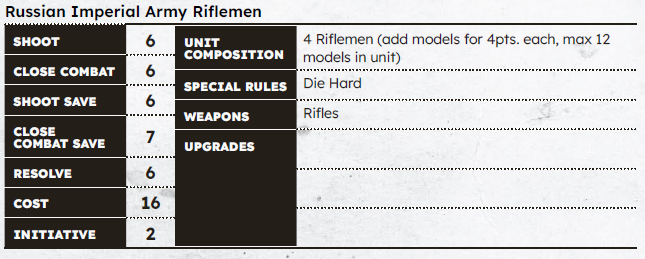
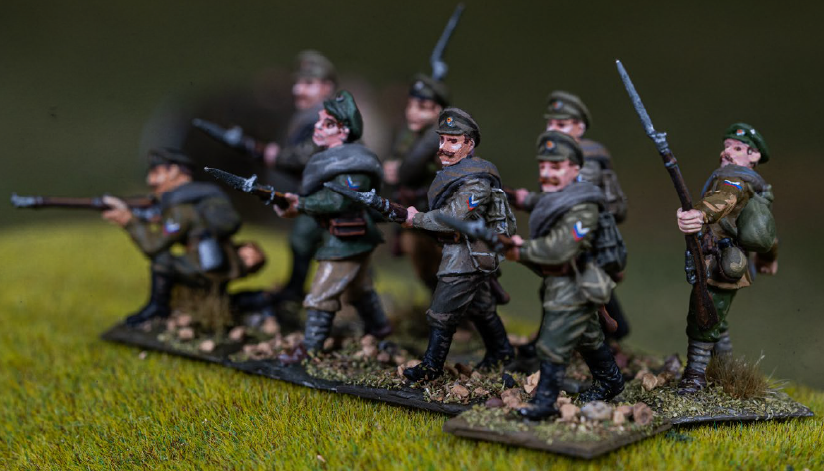
The basic Russian Rifleman shares the same statline as most other rifleman units in Blood and Valor. They aren’t good, but aren’t terrible. The key difference is that they lack the options of grenades and LMGs, meaning they cannot match other rifleman units in the number of dice thrown per shooting attack.
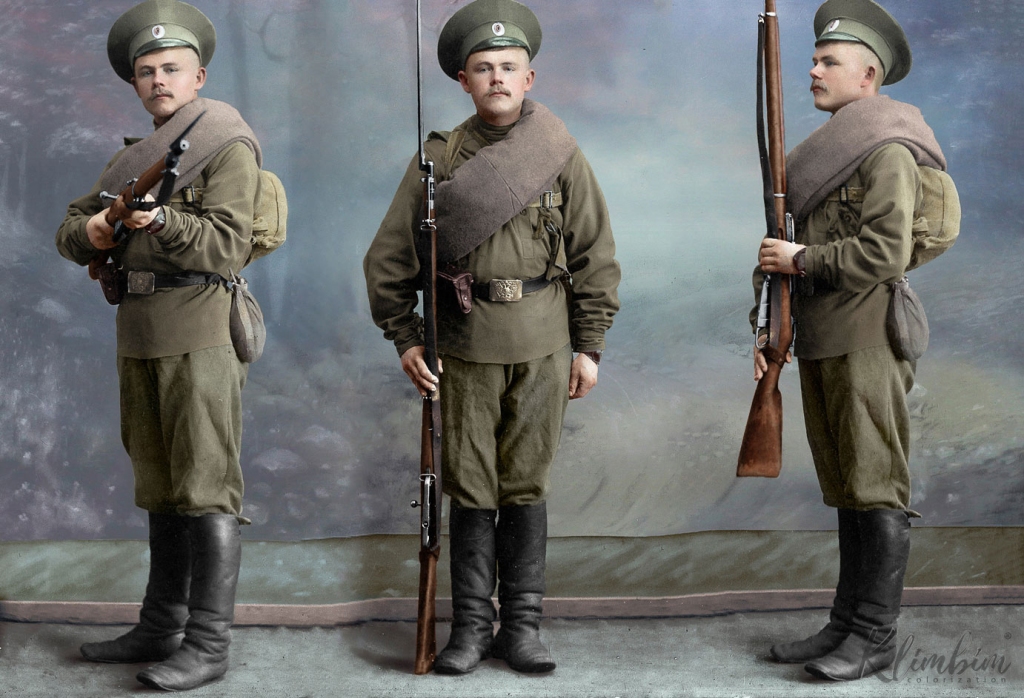
The Russian Infantrymen with his Mosin-Nagant rifle, was the backbone of the Imperial Army. Russian troops zeroed their Mosin-Nagant with the bayonet fixed, as the infantrymen was expected to have his bayonet ready at any moment.
The secret sauce is Die Hard and the points savings. The lack of weapon options means there are points freed up to take things like Gas Barrages to mess with your opponent, or to include another unit of Riflemen. Die Hard will keep these soldiers on objectives and they can always defensive fire (unless it forces you to 7 Fatigue – and you shouldn’t ever be that close to breaking!) Be sure to keep them within the command range of the Commander to take advantage of that sweet -1 bonus to Rally tests!
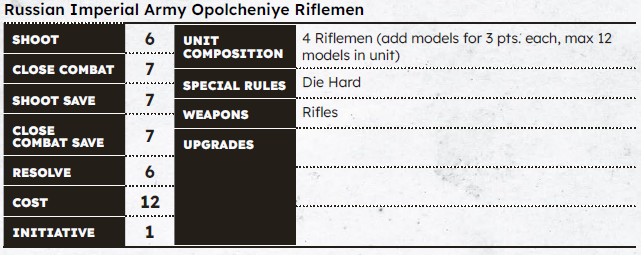
Opolcheniye Riflemen are inexperienced riflemen with a worse stats overall than the standard Russian Rifleman. While they share the same Resolve and Shoot value, their Saves, Close Combat, and Initiative are worse. If you are trying to take more support options, the 3 point models are great for making room.
Once again, Die Hard is great, but make sure you keep them behind cover (preferably Hard Cover) and within the Command Range of your commander to keep Fatigue off and to combat their 7+ save.
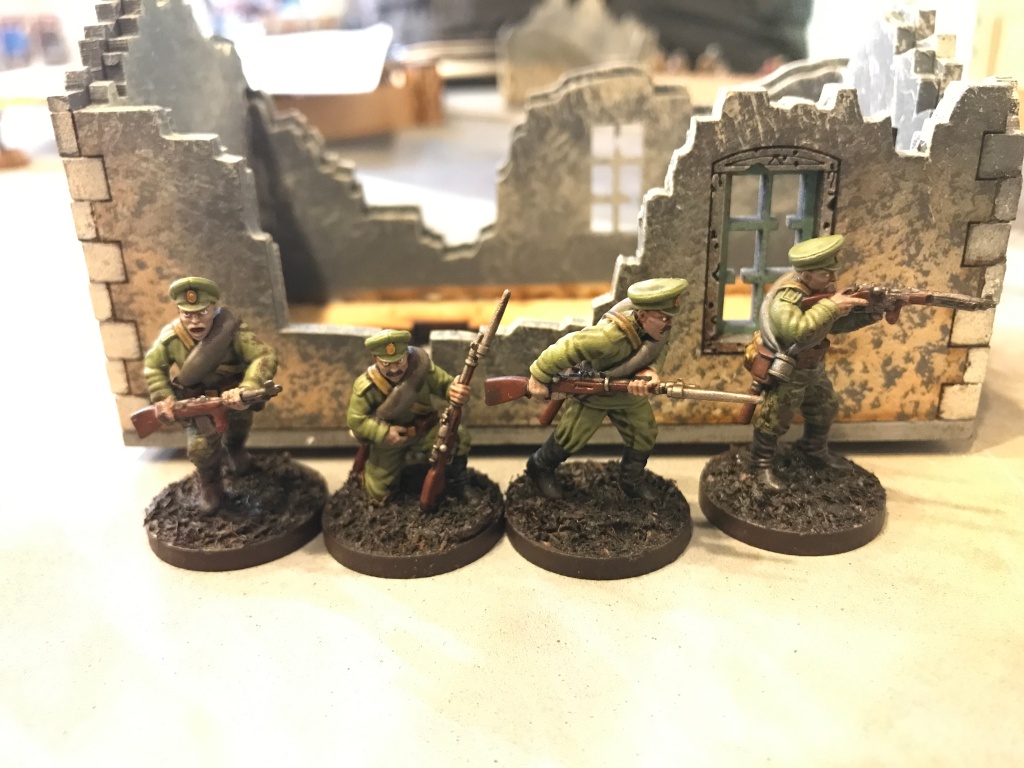
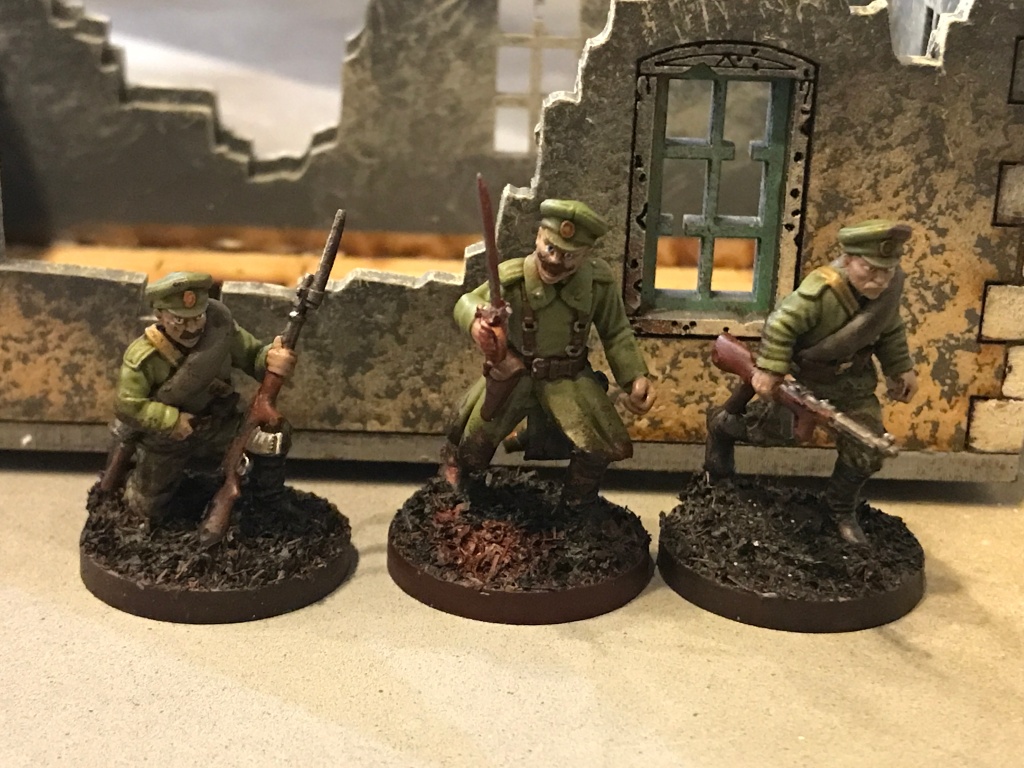
The Riflemen Models can be used for Riflemen, Opolcheniye Riflemen, or Gvardiya CCS. Just make sure you paint them to differentiate!
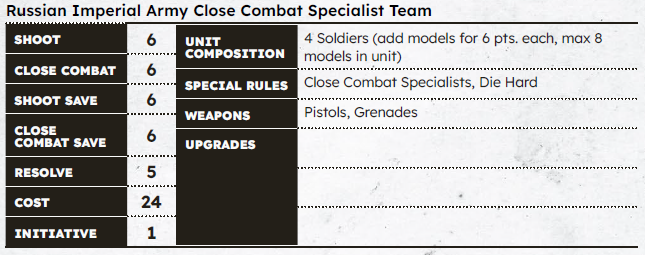
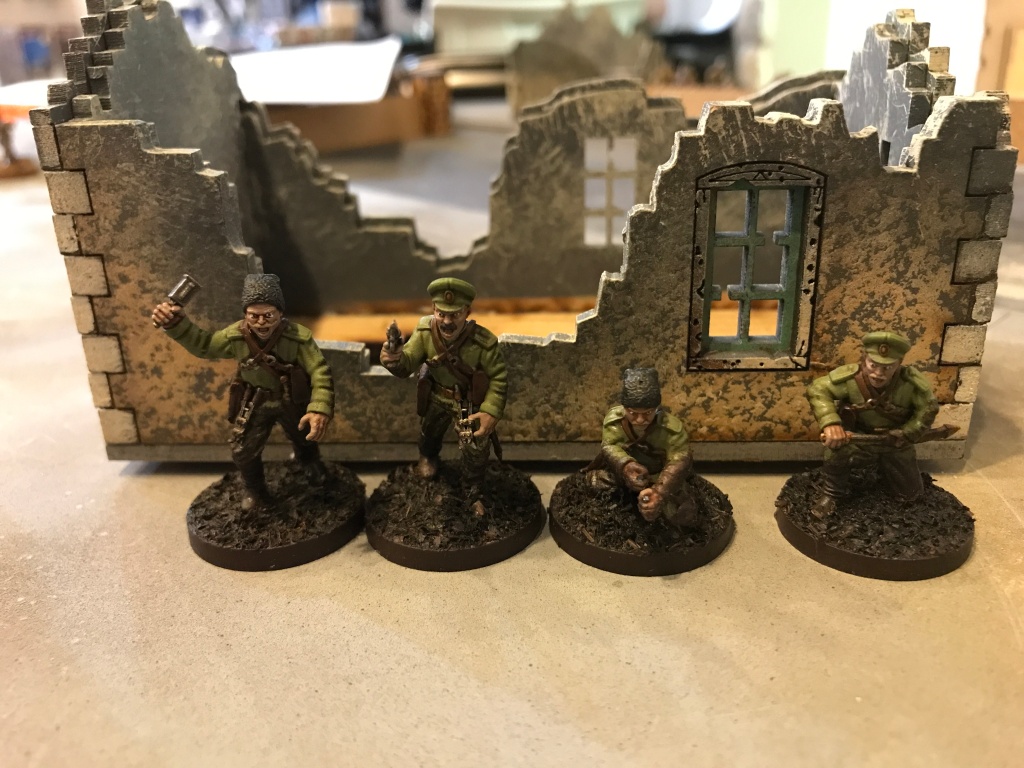
Russian Close Combat Specialists (CCS) are the trench raider unit of the Imperial Russian Army. For 6 points a model with Die Hard, and Close Combat Specialists they are a solid melee unit that need to be run in between cover in order to get within range for their pistols. Once in melee, they will overwhelm most units in the game and are nearly impossible to rout without eliminating the entire unit. If playing on a smaller board or with lots of terrain, make sure these guys take out weaker units and reduce your opponent’s Initiative Points.
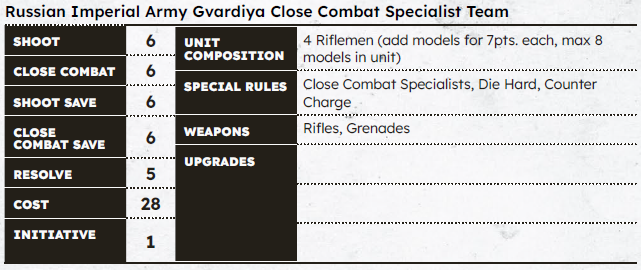
Gvardiya Close Combat Specialists are a mixture of Rifleman and CCS. While pricey at 7 points per model, they can shoot and stab with their bayonets, unlike the regular CCS who only have pistols. Having Die Hard, Counter Charge, and Close Combat Specialists makes them even more of a pain to dislodge than regular Riflemen. If you don’t think you’ll be able to get your pistol-wielding CCS into melee, take Gvardiya instead so you have a crack melee unit with a rifle.
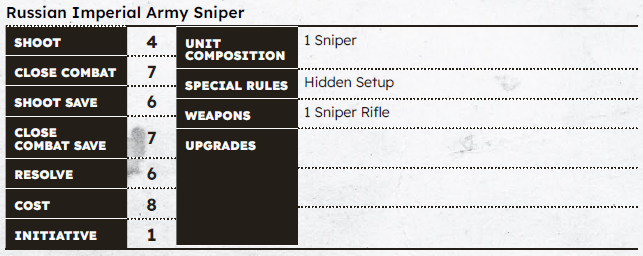
The Russian Imperial Sniper is what you use to cause fatigue. While the statline may seem unimpressive after the Shoot value, the sniper has Hidden Setup which means he cannot be targeted until the he shoots! While one shot may seem lackluster for 8 points, hitting a unit with a Sniper automatically inflicts 1 point of Fatigue before they roll any Resolve Saves. While 1 shot won’t always take out a mini, the sniper is essentially crowd control for 8 points. Should your opponent choose to shoot the sniper instead of one of your other units, then they have wasted their action to take out 1 model. Its a win-win!
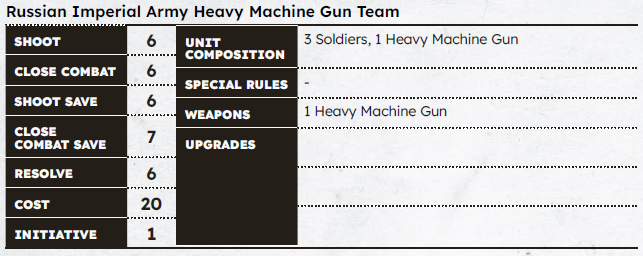
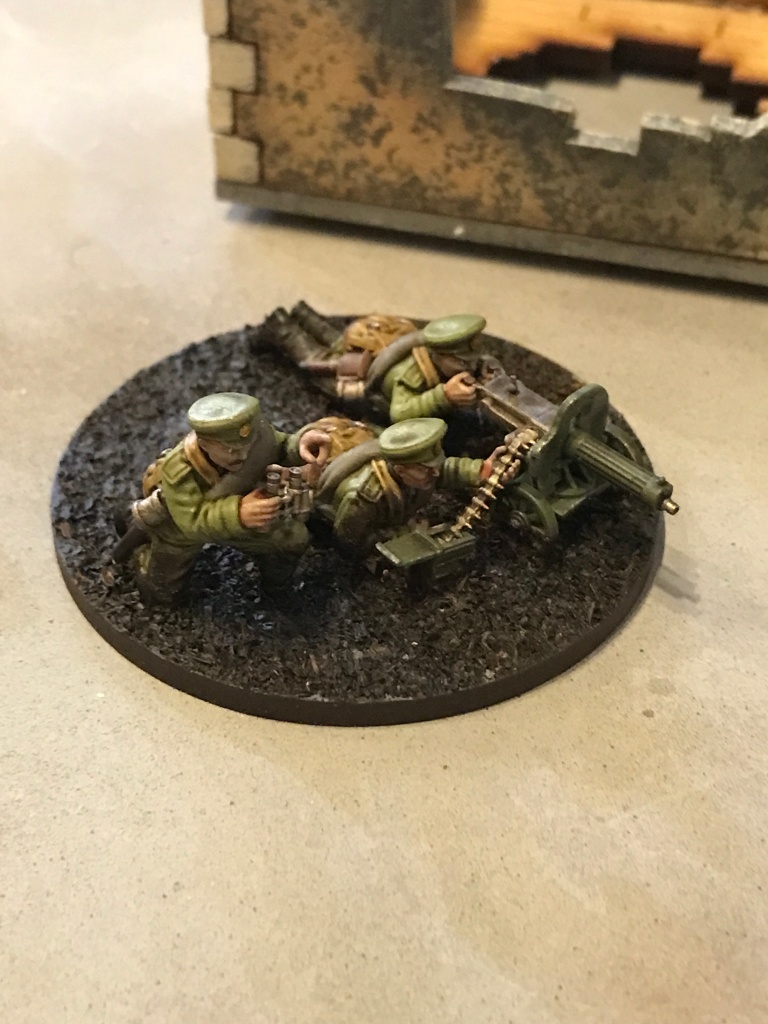
The Russian HMG is similar to every other HMG Team in the game. For 20 points you get to throw 8 dice at a unit, with a +1 penalty to their save. While they lack Die Hard or any other special rules, 8 dice can ruin someone’s day – especially if they are out in the open! The HMG team is especially effective at mowing down enemy cavalry and robbing units of their Hard Cover bonus.
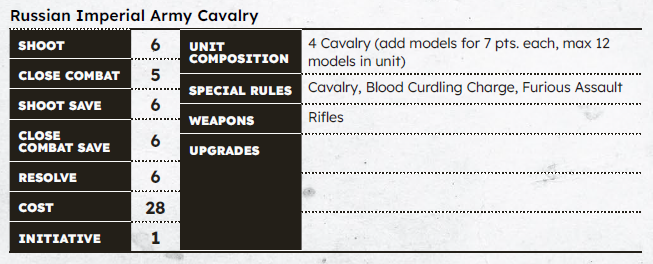
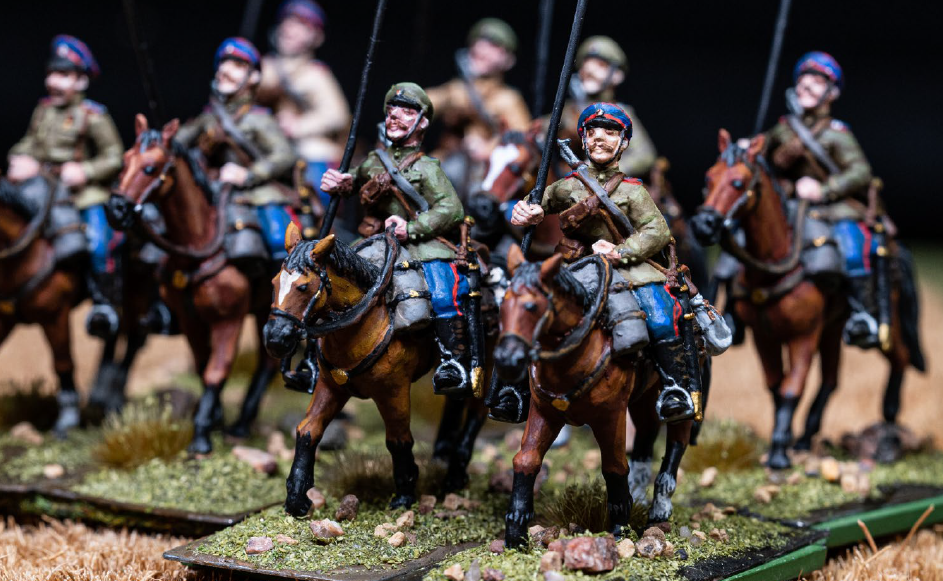
The Russian Army Imperial Cavalry is designed to take out Rifleman Units quickly and efficiently. Blood Curdling Charge drops that awesome 5 Close Combat Value down to a 4 on the charge, and Furious Assault gives them a 6″ threat range for a charge! Cavalry gives the unit a free Advance action so long as they aren’t Shaken, but adds a +1 to their Shoot Save. The best use for these crazy horsemen is to flank and take out weaker infantry squads or weapons teams like Field Guns or HMG teams, just don’t leave them out in the open or they will be shot to pieces!
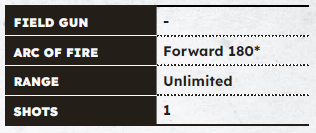
Field Guns are great for long range firepower, especially on maps with lots of hard cover. They cost 25 points and make a great compliment to an HMG team. They roll 6 dice when they hit a target and ignore cover! Additionally, any unit hit with a Field Gun saves on 9+, which is good for you, and bad for them. Use a Field Gun to take out an annoying HMG Team hiding inside a building or rain hell down on problem units that are preventing your troops from maneuvering. Remember, if they are taking pot shots at your big, scary Field Gun, they aren’t shooting your glorious Riflemen! The only downside is you only roll 1 dice for the “initial hit”, so be sure to take an Aim Action!
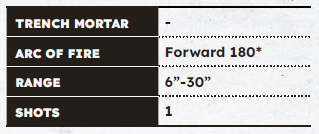
Added in the End of Empires expansion, the Trench Mortar is like a Field Gun, but smaller. If the 1 shot hits a unit, they roll 5 d10s and save on 9s while ignoring cover. The Trench Mortar is only 20 points and rolls 1 less die than a Field gun, but if you don’t have 5 points to spare, its a solid option. Like the Field Gun, it pairs well with an HMG to target problem units or units with poor Resolve values. Is the enemy commander hiding in a building? Drop one of these on him (don’t forget to aim!) and you stand a pretty good chance of offing him and his cronies.

As of End of Empires, a Gas Barrage no longer takes up a support slot. While the gas barrage makes any unit (friendly or not) suffer a 4d10 Resolve Test, it lacks any killing power. However, there’s a possibility of reducing your opponent’s effectiveness for a turn if they roll poorly. Your opponent may choose to move units 4″ away and towards their deployment zone if it gets them out of the gas, which means they now have compromised their initial movement plans , which is a win for you! Since the Russian Imperial Army can’t compete with the raw firepower of other nations’ riflemen, this is a solid equalizer and may give you a turn to maneuver, secure objectives, or continue to lay on Fatigue through shooting. Just hope you don’t roll a 1 or a 2 on the initial test or your gas may end up on your own units!
Like with the aforementioned Gas Barrage, an Artillery Barrage no longer takes up a support slot! However, the Artillery Barrage is only slightly more lethal then Gas. For an Artillery barrage, the Resolve Test is only 3d10 instead of 4, and if the affected unit rolls a 1 on any of their dice for the Resolve test, that model has been hit by shrapnel and is removed as a casualty with no save. In my opinion, the Gas Barrage is a better play as Fatigue on units that don’t have Die Hard can really throw a wrench in your opponent’s plans.
Commanders
While the Russian Imperial Army doesn’t have a ton of named characters, the “standard” commanders are pretty basic and will work for most games. Their two named characters offer some spicy rules and Antonina Palshina can even take over for your commander if he catches a bullet with his face!
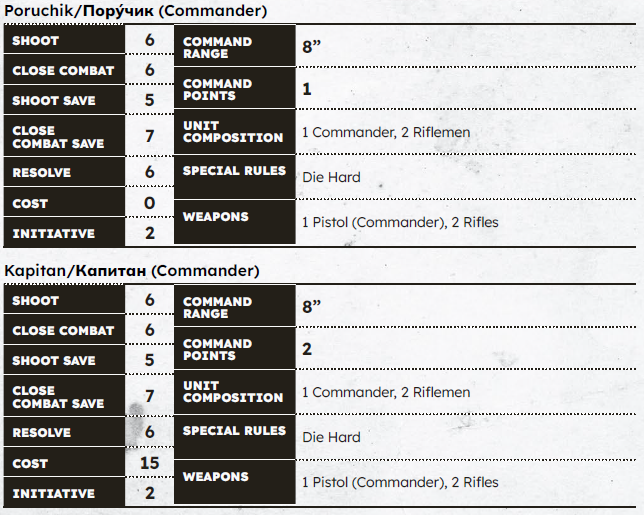
The first two standard commanders are identical in everything except their command points and points cost. If you’re doing a demo at 100 points, the free commander is a no brainer. Anything over 100 and the Kapitan is solid for those 2 command points. Be sure to keep your commander within 8″ of a many units as possible for that sweet -1 to Resolve tests, but make sure your opponent can’t dump 13 dice on him and his two riflemen. Die Hard will keep them from running but that means 6 Fatigue (less if a model was killed!) will make you lose your commander. The main downside is that their 8″ range is weak for the use of a Grand Maneuver.
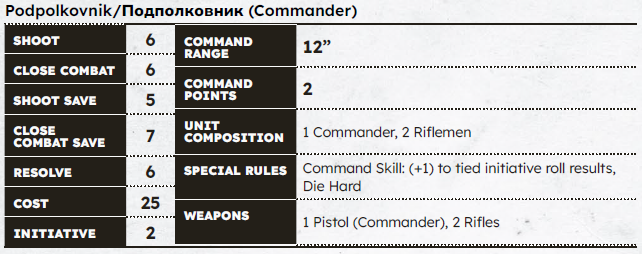
For 25 points the Podpolkonvik (the equivalent of a Lieutenant Colonel) commander comes with an awesome 12″ Command range, two command points, and the Command Skill Special Rule. This means if you and your opponent tie for initiative, you get to add +1 to that bet in order to go first! 12″ Range is fantastic for making sure most of your force gets that -1 bonus to Resolve tests, as well as for the Grand Maneuver! The only downside is that for 25 points you’ll want to bring him in lists of 200 points or more.
Named Commanders: Vladimir Kotlinsky
Vladimir Kotlinsky is the only named commander for the Russian Imperial Army, but he is arguable one of the best known. He was present during the famed “Attack of the Dead Men” in which Russian troops charged a numerically superior German force and terrified the Germans by looking like “dead men” due to being gassed and having to wrap themselves in cloth to stem the bleeding from the eyes, nose, and mouth.
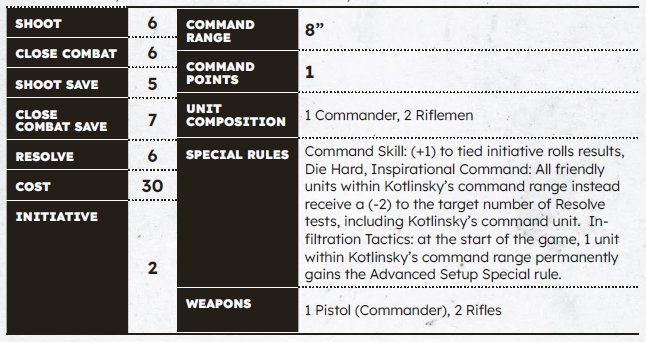
Kotlinsky costs a whopping 30 points, which seems like a ton for only 8″ of range and 1 command point, but his Special Rules set him apart. Inspirational Command give everyone within his 8″ command range a -2 bonus to Resolve Tests, and Infiltration Tactics gives 1 unit within his 8″ Command Range the Advanced Setup Special Rule, allowing 1 unit to gain a free 8″ Run action after deployment. Finally, he has the tried and true Die Hard Special Rule.
While 30 points seems a lot to stomach, Kotlinsky is at home in close to medium Range where his -2 bonus combined with Die Hard means nobody within 8″ will be taking any fatigue, and if they do, they’ll drop it off quickly. Use Advanced Setup to get a head start towards any objectives or get that HMG team to a great spot to dish out some dice.
The Federov Avtomats were printed and added by me. For those wanting to say “BuT DaN – tHeRe wErE oNlY 40 EvEr Used!”, I had exactly 40 printed, so we are still 1:1 for Historical Accuracy!
Named NCO – Antonina Palshina
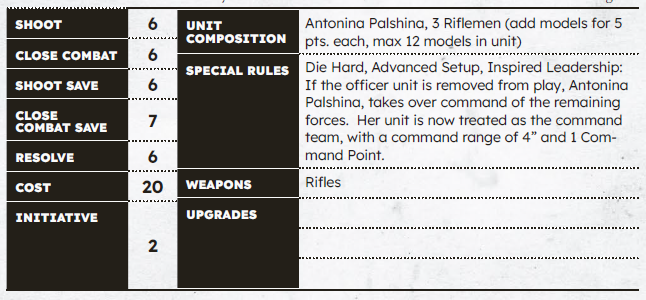
While not technically a commander, Antonina Palshina is a named character attached to a unit of riflemen who can become a commander with a 4″ range and a single command point should you lose your initial commander. For 8 points (20-12) she is essentially the cost of 2 riflemen models, which is fair in order to have a “surprise commander” in your back pocket. If you have the points, she’s NEVER a bad choice.
Tactics
In most Wargames, any time Russia makes an appearance, they are often called the “Zerg-Rush Army”. For those born after Starcraft’s Popularity, this means overwhelming your opponent with a horde of inexpensive, low-quality troops. At 200 points, you can take Six 8-man units of Opolcheniye Riflemen and a Sniper. While this may seems tempting – especially with Die Hard to keep your Riflemen in the fight – it will lack any equalizers like Gas Barrages or Gvardiya. The 7+ saves also mean your Opolcheniye Riflemen will more than likely get destroyed by any enemy MG teams.
A solid core of 4 units of Riflemen is great for 200 point games. The most recent game I played I had three 6-man riflemen teams, an HMG, Vlad Kolinsky, an 8-man Gvardiya squad, and a Gas Barrage. These gave me enough flexibility to have enough initiative and squads for maneuvering, and a Gas Barrage to really mess with my opponent’s advances.
The main thing to focus on is Fatigue Management to keep your units from routing. Next focus on your opponent’s “problem” units. If your opponent has an HMG in an unfavorable position for you, focus your rifle-fire on it, while your own HMG team fires at any unit that may be screening an objective or moving up to charge one of your units. Dropping a Gas Barrage on turn 1 or 2 while your opponent’s Forces are unable to run back far enough to avoid it is great for buying time, and an Artillery barrage may even kill 1 or 2 soldiers. Snipers are also great for suppressing HMG Squads or Field Guns once they have 2 or more Fatigue.

The “Church on Blood in Honour of All Saints Resplendent in the Russian Land” is being constructed on the site of the Ipatiev House, where the Romanov Family was murdered by the Bolsheviks on July 16th, 1918 – heralding the end of Imperial Russia
Conclusion
While the Russian Imperial Army performed very poorly during the Great War, they perform well on the tabletop and shake up the game with their stubbornness and iron will. Any player who hasn’t had dealt with Die Hard before may be so discombobulated (scientific term) – it gives you the chance to seize objectives or knock out a unit or two. They are a welcome addition to Blood and Valor and break the mold for Russia when compared to most other wargames. If you haven’t tried them, I highly recommend them!
Historical Sources
Hew Strachan, The First World War (2001) pp. 297-316.
Alan K. Wildman, The End of the Russian Imperial Army (Princeton University Press, 1980)
Sean McMeekin, The Russian Origins of the First World War (2011) pp 115–174.
Katrin Boeckh, “The Rebirth of Pan-Slavism in the Russian Empire, 1912–13.” in Katrin Boeckh and Sabine Rutar, eds. The Balkan Wars from Contemporary Perception to Historic Memory (2016) pp. 105–137.
Peter Gatrell, “Tsarist Russia at War: The View from Above, 1914–February 1917.” Journal of Modern History 87, no. 3 (2015): 668–700 at pp 674–77.
“The Canonization of the New Martyrs by the Council of Bishops of the Russian Orthodox Church Outside of Russia in 1981-How It Happened”. Archpriest Serafim Gan. The Russian Orthodox Church Outside of Russia. Retrieved 14 July, 2021
